Saturday, May 23, 2009

Telling QuickBooks How Reminders Should Work

The My Preferences tab of the Reminders Preferences set consists of just one check box: You can use it to tell QuickBooks that you want to see the Reminders list when you open a company file. Because the My Preferences tab includes only a single check box, I don't show it here as a figure.

The Company Preferences tab, as shown in Figure 1, provides a bunch of radio buttons that you can use to specify how QuickBooks should remind you of accounting and bookkeeping tasks that you need to complete: Checks to Print, Paychecks to Print, Invoices/Credit Memos to Print, Overdue Invoices, Sales Receipts to Print, Sales Orders to Print, Inventory to Reorder, Assembly Items to Build, Bills to Pay, Memorized Transactions Due, Money to Deposit, Purchase Orders to Print, To Do Notes, and Open Authorizations to Capture.

Figure 1: The Company Preferences tab of the Reminders Preferences dialog box

For each of these accounting or bookkeeping tasks, you indicate whether you want to see a reminder for the item in the Summary list that appears in the QuickBooks Company Preferences Reminders list. You can also choose to actually see the List of Tasks — such as the list of Checks to Print — or you can indicate that you don't want to be reminded of some particular category of accounting or bookkeeping. For some of the reminder notes, you indicate how many work days in advance you want to be reminded. For example, if you indicate that you want to be reminded to print checks, you must indicate how many days before the check date that you want the reminder to appear. You do this by entering a numeral in one of the Remind Me text boxes.

Thursday, May 21, 2009

Controlling How Payroll Works

The Payroll & Employees Preferences set includes only Company Preferences. The Company Preferences tab is shown in Figure 1. The QuickBooks Payroll Features radio buttons let you tell QuickBooks how you want to handle payroll: using an outside payroll service such as Intuit Complete Payroll (select Complete Payroll Customers in this case), using QuickBooks payroll features (select the Full Payroll radio button), or that you're not using payroll at all (select the No Payroll radio button).

Figure 1: The Company Preferences tab of the Payroll & Employees Preferences dialog box

The Pay Stub & Voucher Printing button lets you tell QuickBooks what employee information to print on the payroll check: employee address, company address, sick pay information, vacation pay information, and pay period information. You can figure out how this works by clicking the button and looking at the dialog box that QuickBooks displays.

The Workers Compensation button lets you fiddle with the way that QuickBooks tracks information related to your workers' compensation tax. The Sick and Vacation button lets you fine-tune how QuickBooks monitors employee sick and vacation pay accrual and usage. Again, click either of these buttons to see a screen that provides more information about how the button works.

In roughly the middle of the Company Preferences tab of the Payroll & Employees Preferences set, QuickBooks supplies several other check boxes and radio buttons:

  • Copy Earnings Details from Previous Paycheck: Another Duh.

  • Recall Quantity Field on Paychecks: QuickBooks recalls or reuses paycheck quantity information from the last pay period's paychecks. (The QuickBooks Help File suggests that you use this option when you have a "fixed quantity that occurs from paycheck to paycheck." The Help File uses the example of tiered sales commissions where the commission amount is set for each tier.)

  • Job Costing, Class and Item Tracking for Paycheck Expenses:

    QuickBooks lets you track payroll expenses not just by account but by job, class, or item.

  • The Assign One Class Per radio buttons (Entire Paycheck and Earnings Item): Enables you to break down wages expense into classes more finely. For example, you can indicate that you want to use a different class for each item that appears on an employee's paycheck. (This option appears only if classes are enabled.)

The Display Employee List By radio buttons let you choose how employee lists are sorted on reports — by first name or by last name.

If you click the Employee Defaults button, QuickBooks displays a dialog box that you can use to set employee payroll default information, such as deductions for taxes or health insurance.

Finally, at the bottom of the dialog box, QuickBooks provides two other options for handling payroll. The Mark New Employees as Sales Reps check box, if selected, does what you'd expect: It marks new employees that you add to the employee list as sales reps. And the Display Employee Social Security Numbers in Headers on Reports check box, if selected, also does what you'd expect: It adds employee Social Security numbers to reports.

Wednesday, May 20, 2009

Controlling Integrated Applications

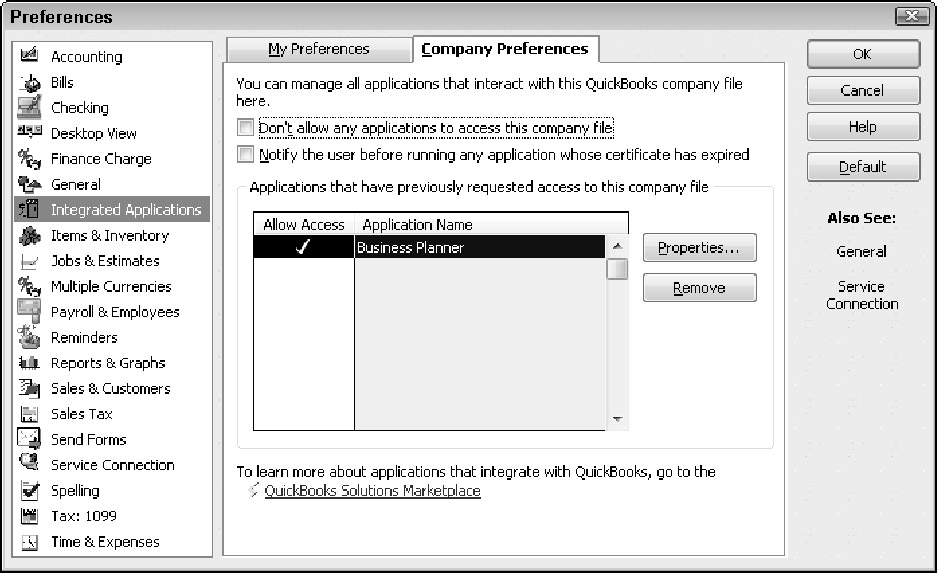
The Integrated Applications Preferences aren't personal, so no options are available on the My Preferences tab. However, the Company Preferences tab for the Integrated Applications Preferences set does control and track other applications, or computer programs that open the QuickBooks company data files. Figure 1 shows the Company Preferences tab for the Integrated Applications Preferences set.

Figure 1: The Company Preferences tab of the Integrated Applications Preferences dialog box

The Don't Allow Any Applications to Access This Company File check box, if selected, tells QuickBooks that it should not allow other applications to open this company data file. The Notify the User Before Running Any Application Whose Certificate Has Expired check box, if selected, tells QuickBooks that it should not allow any program whose security certificate is out of date to open the QuickBooks company data file without first notifying the user (that's you).

The drop-down list on the Company Preferences tab of the Integrated Applications Preferences set shows the name of the applications that have previously requested to open the QuickBooks company data file. You can remove an application from this list by clicking the application and then the Remove button. You can change the rules or properties that the QuickBooks program applies to access this other application by clicking the application in the list and then clicking the Properties button.

Monday, May 18, 2009

Setting General Preferences | Quickbook 2009

Figure 1 shows the My Preferences tab of the General Preferences set. This tab provides check boxes that you can select to tell QuickBooks to do the following:

  • To move the selection cursor from one field on the window to the next field when you press Enter

  • To automatically open drop-down lists when typing

  • To beep when you record a transaction

  • To automatically place a decimal point two characters from the right end of the number

  • To warn you when you are editing an existing transaction

  • To bring back all the one-time Help messages that it shows

  • To turn off pop-up messages for products and services

  • To show ToolTips for clipped text

  • To warn you when you're deleting an existing transaction or some item on a list

  • To automatically recall account or transaction information — telling QuickBooks, for example, to automatically recall the last transaction for a particular customer, vendor, or employee

  • To use either today's date or the last entered date as the default date

  • To keep custom item information changed as part of entering a transaction

Figure 1: The My Preferences tab for General Preferences


Tip

If you have specific questions about the My Preferences check boxes that are available for the General Preferences options, click the Help button that appears along the right edge of the Preferences dialog box. QuickBooks provides brief but useful descriptions of how the Preferences options work and what they do.

Figure 2 shows the Company Preferences tab for the General Preferences set. The Time Format radio buttons let you specify whether QuickBooks should show the minutes in an hour as a decimal value or as minutes. The Time Format radio button descriptions include examples of how these two approaches vary, so look closely at the dialog box if you have questions. The Company Preferences tab includes a check box that lets you specify that QuickBooks should always show years using four digits. And the Company Preferences tab includes a check box that you can select to tell QuickBooks that it shouldn't update the name information for a particular customer, vendor, employee, or other name when you're saving a new transaction for that customer, vendor, employee, or other name.

Figure 2: The Company Preferences tab for General Preferences

Sunday, May 17, 2009

Changing the Desktop View

Figure 1shows the My Preferences tab of the Desktop View Preferences set. The My Preferences tab provides View radio buttons — One Window and Multiple Windows — that let you indicate whether QuickBooks should use one window or multiple windows for displaying all its information. The Multiple Windows option looks like older versions of Microsoft Windows.

Figure 1: The My Preferences tab for the Desktop View Preferences

With multiple windows, an application such as QuickBooks displays multiple, floating document windows within the application program window. If you have a question about how this works, your best bet is to simply try both view settings.

The Desktop radio buttons (see Figure 1) let you specify whether and when QuickBooks should save the current appearance, or view, of the desktop. You can select the Save When Closing Company radio button to tell QuickBooks that it should save the view of the desktop when you close a company. When you reopen a company, QuickBooks then reuses this desktop view. You can also select the Save Current Desktop radio button to tell QuickBooks to save the current view and then reuse this view when QuickBooks later opens. If you don't want to make changes to the default desktop view, select the Don't Save the Desktop radio button.

The Desktop check boxes let you specify whether QuickBooks should display the QuickBooks home page, the Coach window and related features, and the Live Community window. If you select a check box, QuickBooks adds the appropriate element — such as the QuickBooks home page.

The Color Scheme drop-down list lets you pick a color set for the QuickBooks program. The default color scheme is the Checkbook: Sea Green scheme. QuickBooks provides several other color schemes, including Denim Blues, Desert Isle, Grappa Granite, and so on. (If you're wild about color, you can experiment with these other options.) Note that these are My Preferences options, which means that they're personal to you. You can experiment with the settings for color without having anyone else see that you're really into Sea Stone or Summer Linen (two other color options).

The Windows Settings buttons let you access the Windows Display Properties and Windows Sounds Properties settings. Typically, you would make changes to Windows Display Properties and Windows Sounds Properties by using the Control Panel tools. However, you can also make changes from within QuickBooks by using these two buttons. (In actuality, when you click these buttons, QuickBooks just starts the Control Panel tools.)

If you have questions about how the Windows Display Properties or Sounds Properties work, refer to the Windows Help file or to a good book, such as Windows XP For Dummies or Windows Vista For Dummies, by Andy Rathbone (Wiley Publishing, Inc.).

The Company Preferences available for the Desktop view let you specify what icons appear on the QuickBooks home page, as shown in Figure 2. The Customers set of check boxes, for example, lets you specify which customer-related accounting tasks are available via icons on the home page. The Vendors set of check boxes lets you specify, in similar fashion, which vendor-related accounting tasks are available via icons on the home page. Near the button of the Company Preferences tab for the Desktop view are other hyperlinks you can click to turn on and off the display of other accounting task icons.

Figure 2: The Company Preferences tab for the Desktop View Preferences
Related Posts with Thumbnails