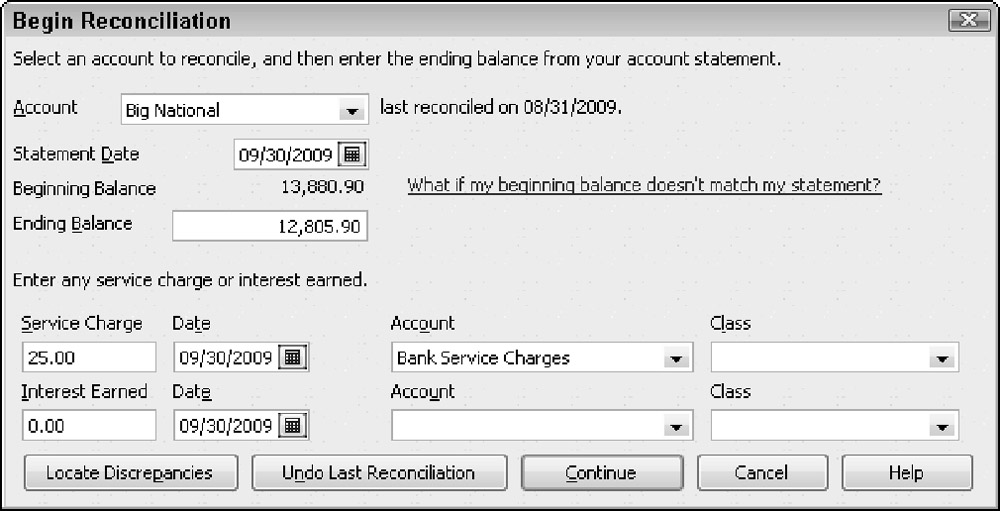
You can reconcile a bank account with surprising speed in QuickBooks. To reconcile the bank account, choose the Banking ð Reconcile command. QuickBooks displays the Begin Reconciliation dialog box, shown in Figure 1.
To begin reconciling your account, follow these steps:
-
Select the account that you want to reconcile from the Account dropdown list.
-
Use the Statement Date box to identify the ending date of the bank statement that you're using in your reconciliation.
As is always the case with date fields in QuickBooks, you enter the date in the mm/dd/yyyy date format or you click the calendar button and use it to select the correct date.
-
Enter the ending balance shown on your bank account statement in the Ending Balance box.
-
Use the Service Charge boxes and the Interest Earned boxes to identify the amount of any service charge or of any interest, the date of any such transaction, and the account that you use to track those charges.
For example, if your bank statement shows a service charge, enter the service charge amount into the first Service Charge box. Enter the date of the service charge transaction into the Service Charge Date box. Finally, enter an appropriate expense account for tracking service charges into the Service Charge Account drop-down list. (Bank charges, for example, is a good account to track service charges.)
In a similar fashion, use the Interest Earned boxes to describe any interest earned on a business account.
-
Review the statement information.
After you enter information about the bank account, the statement date, the ending balance, and any service charge or interest earned information, take a moment to review the information and confirm that it is correct. You'll have a whale of a time reconciling an account if the amount that you're trying to reconcile to is incorrect.
-
After you make sure that everything is hunky-dory, click the Continue button.
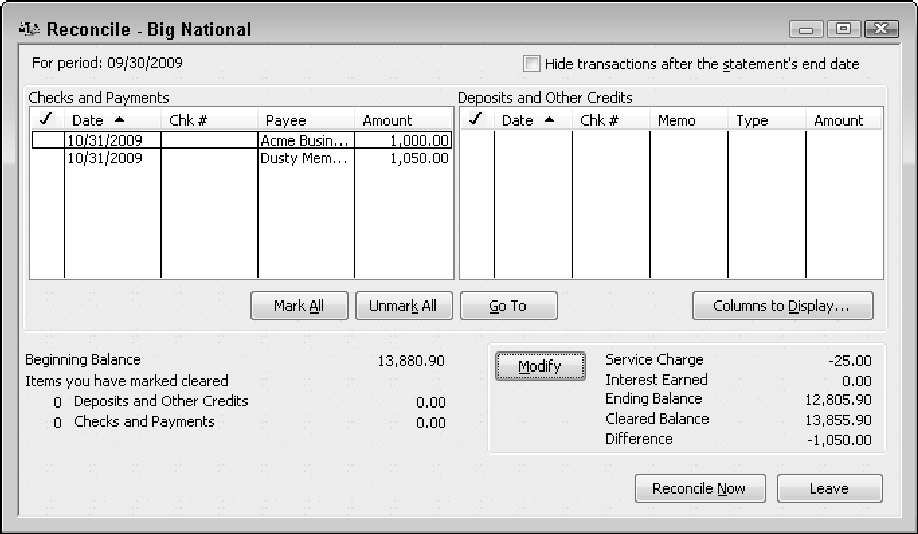
QuickBooks displays the Reconcile window, as shown in Figure 2.
-
To identify checks and payments transactions that have cleared your bank account, click the transactions that have cleared.
The Reconcile window displays two lists of transactions: a list of checks and payments, which appears on the left, and a list of deposits and other credits, which appears on the right. When you click a transaction, QuickBooks marks the transaction with a check mark. The check mark indicates that a transaction has cleared. You can mark all the transactions on a list as cleared by clicking the Mark All button. You can unmark all the transactions on a list as uncleared by clicking the Unmark All button.
Use the Deposits and Other Credits list to identify those deposit transactions that have cleared the bank account. You identify a cleared deposit transaction in the same way that you identify a cleared check or payment transaction. You can click a transaction, which causes QuickBooks to mark the transaction as cleared. You can also use the Mark All and Unmark All buttons to mark or unmark all the deposits and other credit transactions at one time.
-
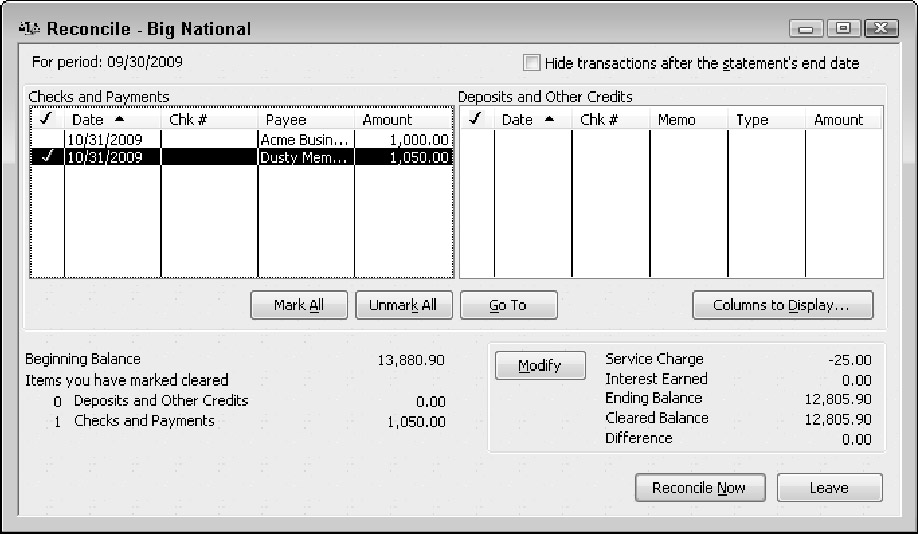
Verify that the cleared balance equals the ending balance.
If you have provided correct information in the Begin Reconciliation dialog box (refer to Figure 1) and you correctly identified all the transactions that have cleared your account, the ending balance should equal the cleared balance, as shown in Figure 3.
-
When the ending balance equals the cleared balance, click the Reconcile Now button.
QuickBooks permanently records your cleared transactions as cleared and redisplays the Register window. If you can't reconcile an account, you can click the Leave button. QuickBooks then saves your half-completed reconciliation so that you can come back later and finish it.
| Tip | Can I interject a couple of tangential comments here? Good. If you want, you can print a little report that summarizes your reconciliation after you click the Reconcile Now button. (QuickBooks gives you this option in a dialog box that it displays.) You can also click the Previous Reports button to display a dialog box that lets you print other old reconciliation reports. You can click the Discrepancy Report button to produce a report that lists transactions that have been edited since you last reconciled the account. Finally, you can click the column headings used in the Reconciliation window to sort and resort the bank account information. |


