Friday, September 4, 2009

Tracking Inventory and Items

If you've worked with QuickBooks, you won't be surprised to hear that the Item list is a key piece of your QuickBooks accounting system. The Item list identifies each of the things that you sell. The Item list also identifies other things that appear on your invoices and—if you use them—on your purchase orders.

I talk about how you work with the QuickBooks Item list: more specifically, how you look at and use the information on the Item list. I explain how to add information to the list and how to edit information already on the list. What's more, I talk about three accounting tasks that are related to your Item list: adjusting physical inventory accounts for inventory shrinkage or spoilage; adjusting price levels of your inventory items; and if you manufacture inventory, how the new version of QuickBooks handles manufactured goods.

Looking at Your Item List

QuickBooks provides a bunch of different ways to see the information that you've stored in your Item list. You may already know some of this stuff if you've worked with QuickBooks a bit. Some of it may be new to you. In any case, the next sections review the half-dozen ways that you can see the items on your Item list.

Using the Item Column

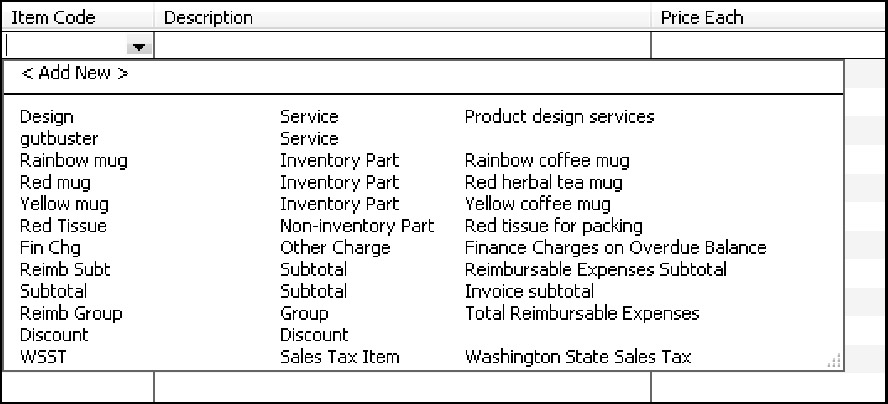
One important point to consider as you look at the Item column and Item drop-down list in Figure 1 is space. Note that the Item drop-down list is pretty narrow. Note also that the Item drop-down list in Figure 1provides the item code (the left column), the item type, and an item description. The item description—if the description is lengthy—is cut off. You'll want to remember this seemingly trivial but important point as you work with your Item file. You want descriptive item codes and, if possible, brief descriptions.

Figure 1: The Item drop-down list on the Create Invoices window


Tip

I'm using pretty self-explanatory item codes in this reference, as you can see from Figure 1. In real life, your codes may be far more cryptic.

Using the Item List Window

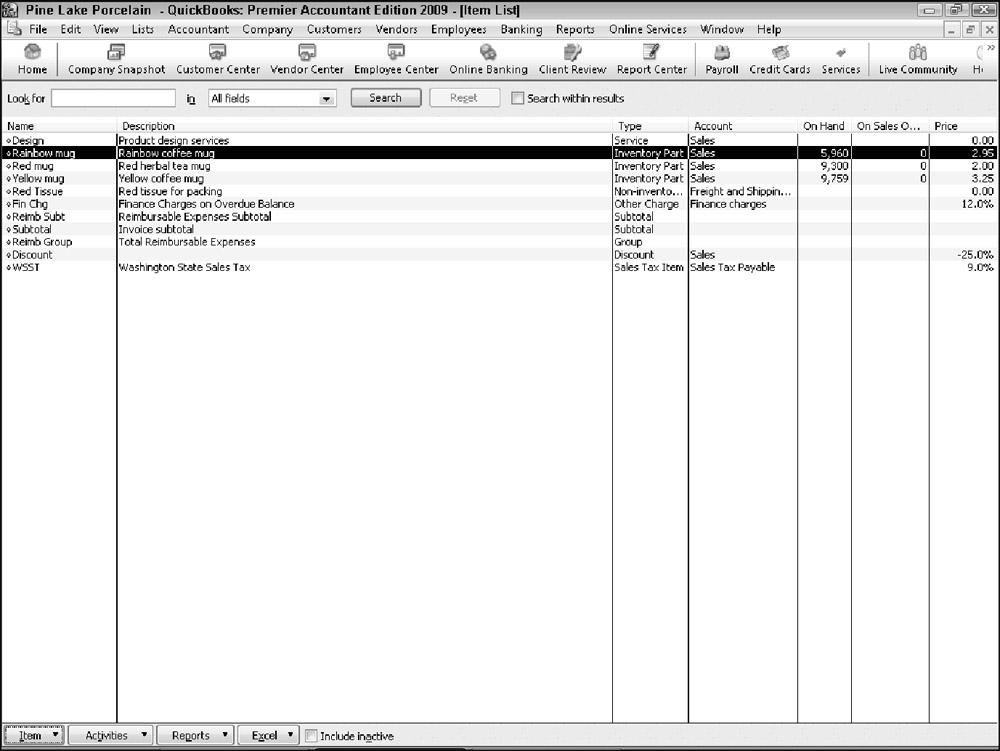
If you choose the Lists ð Item List command, QuickBooks displays the Item List window, as shown in Figure 2. The Item List window identifies the item code or name, the description, the type of item , the account that gets credited when you sell some of the items, and the inventory stocking and pricing information (if you supply that).

Figure 2: The Item List window

The Item list provides a good way to quickly see what items you can put on invoices and purchase orders. The Item list also provides a quick and convenient way to see the stocking levels and prices.

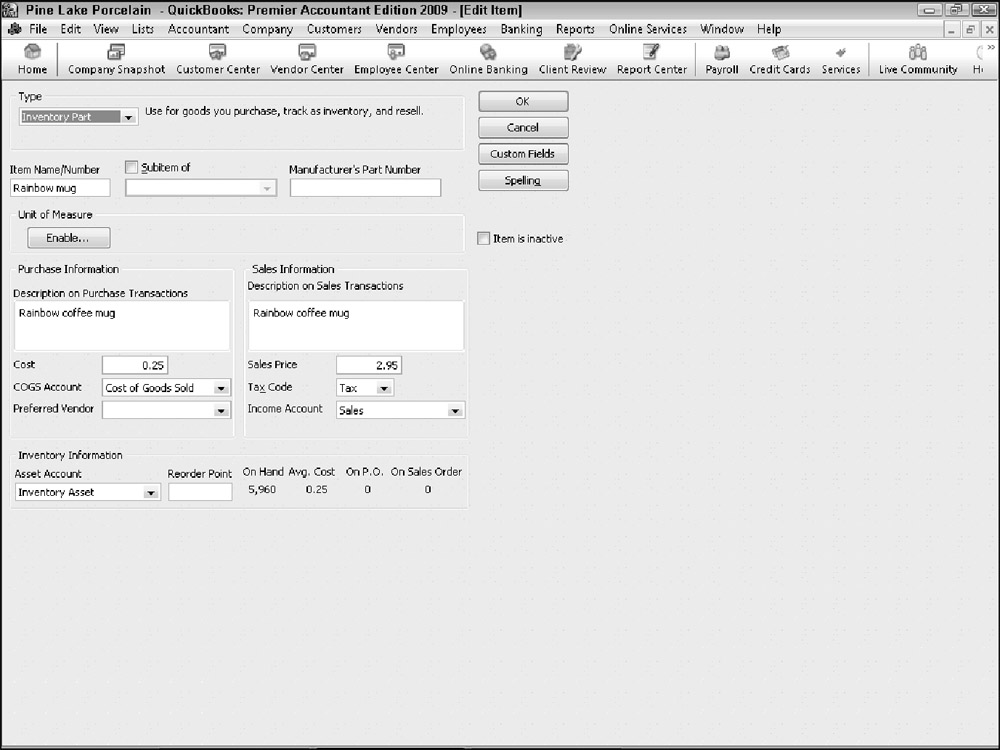
If you want more information about an item shown in the Item List window, you can double-click the item. When you double-click the item, QuickBooks displays the Edit Item window, as shown in Figure 3. Essentially, the Edit Item window displays all the information available about a particular item. You can use the Edit Item window to change bits of item information.

Figure 3: The Edit Item window

Using the Inventory Reports

I mention one other thing because it's so darn useful. As you would expect, QuickBooks supplies several interesting, useful inventory reports. If you choose the Reports ð Inventory command, for example, QuickBooks displays a submenu of inventory reports. The submenu provides reports that give inventory valuations, inventory stock levels, and a worksheet that you can use to go out and physically count the inventory on store shelves or in the warehouse.

Wednesday, September 2, 2009

Reviewing the other Vendor Menu Commands

I talk about the most important commands on the Vendor menu. Nevertheless, before I wrap up this little dog and pony show, I will quickly review for you the other commands and what they do.

Vendor Center

The Vendor Center window, shown in Figure 1, displays a list of vendors and detailed vendor information for the selected vendor. To use it, select from the Vendors drop-down list the vendor for which you want to see detailed information. The Vendor Center shows a bunch of information for a vendor. This information all comes from the Vendor List, by the way.

Figure 1: The Vendor Center

Tip

If you keep records of your vendors, including information such as their telephone numbers, about the best place to store that information, in my humble opinion, is in the Vendor List. You have to maintain the Vendor List in order for QuickBooks to work. So why not also go to a little bit of extra effort and keep all your vendor information there? If you adopt this approach, the Vendor Detail Center window is the window that you can use to quickly look up things such as the vendor's phone or fax number.

Sales Tax Menu Commands

The Sales Tax command displays a submenu of commands that pay sales tax amounts you've collected to the appropriate tax agency; adjust the sales tax liability due; and produce reports on the sales tax liability you owe, the sales tax revenue you've generated, and the sales tax codes you've set up.

To pay the sales taxes you owe, simply choose the Vendors ð Sales Tax ð Pay Sales Tax command. When QuickBooks displays the Pay Sales Tax dialog box (which lists the amounts you owe various sales tax collection agencies), you select the agencies you want to pay or click the Pay All Tax button. QuickBooks then records checks into the bank account register, and you print the checks in the usual way.

To adjust the amount that QuickBooks thinks you owe a sales tax collection agency, you can choose the Vendors ð Sales Tax ð Adjust Sales Tax Due command. When QuickBooks displays the Sales Tax Adjustment dialog box, select a sales tax agency from the Sales Tax Vendor box and an appropriate expense or income account from the Adjustment Account box. Next, you select the appropriate button (either Increase Sales Tax By or Decrease Sales Tax By) and enter the adjustment amount into the Amount box.

To print one of the sales tax reports, simply select the command that corresponds with the report. For example, to print the Sales Tax Liability report, choose the Vendors ð Sales Tax ð Sales Tax Liability command.

The Manage Sales Tax command displays a window with buttons and clickable hyperlinks that you can use to get sales tax information and perform some of the tasks described in the preceding paragraphs.

Inventory Activities

The Inventory Activities menu displays a submenu of commands you use to work with QuickBooks inventory features and with the related Item list. I am not going to discuss this stuff here.

Print 1099s/1096

The Print 1099s command displays the Printing 1099-MISC and 1096 Forms dialog box, which lets you print 1099-MISC forms for a selected calendar year. You can select the year for which you need to print 1099 forms by selecting a date range description from the drop-down list. Initially, for example, the drop-down list shows Last Calendar Year. Alternatively, you can use the From and To boxes to specify the starting and ending point for the year. After you identify the year for which you want to print 1099 forms, click OK. QuickBooks then creates 1099 forms for any vendors who need them, provided that your 1099 preferences are set up correctly and the vendor is marked as a 1099 recipient in the Vendor List.

You typically send 1099 forms to vendors to whom you pay more than $600 in a year. You can control the actual threshold amount — it varies from year to year because of inflation and type of payment — by choosing the Edit ð Preferences command, clicking the Tax: 1099 icon, and then clicking the Company Preferences tab. For more information about how to set tax 1099 preferences.

Item List

The Vendors ð Item command displays the Item List window.

Monday, August 31, 2009

Paying Bills

If you use QuickBooks to keep track of the bills that you owe, you don't use the Write Checks window to record the bills that you want to pay. Rather, you tell QuickBooks to display a list of these unpaid bills that you've already recorded — and then you pick and choose which bills QuickBooks should pay and the bank account from which QuickBooks should write the check.

Follow these steps to pay bills in this manner:

  1. Choose the Vendors ð Pay Bills command.

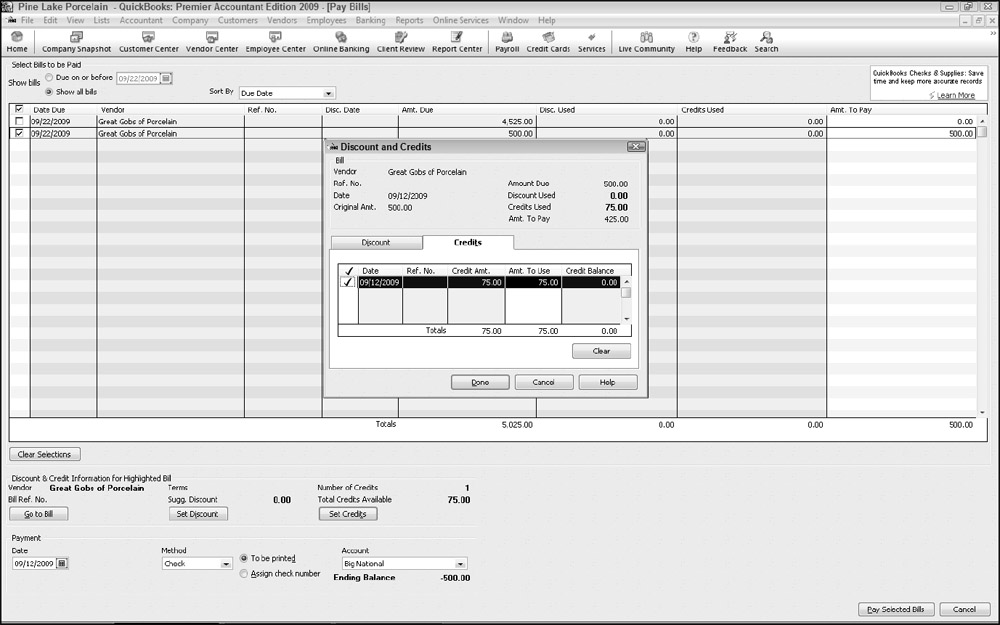
    QuickBooks displays the Pay Bills window, shown in Figure 1. You use the Pay Bills window to describe the payment that you want to make.

    Figure 1: The Pay Bills window

  2. Describe which bills you want to pay.

    Use the Show Bills radio buttons at the top of the Pay Bills window to identify what you want to see. Select the Due On or Before radio button to show only those bills that are due on or before the specified date. To specify the date, enter the date into the Due On or Before date box. To see a list of all the bills that you have to pay, select the Show All Bills radio button.


    Tip

    You can use the Sort Bills By drop-down list to select the order that QuickBooks uses for listing your bills. For example, you can sort bills by due date, discount date, vendor, and amount due.

  3. Select the bills that you want to pay.

    To select bills that you want to pay, click the check column. The check column is the leftmost column in the list of unpaid bills — it's headed by a check mark. When you click the check column, QuickBooks marks the bill with a check mark. The check mark tells QuickBooks that you want to pay that bill. To deselect a bill, click the check column again. QuickBooks removes the check mark.

  4. (Optional) Review a specific bill.

    You can review detailed information about a specific bill by first clicking the bill to highlight it in the list and then by clicking the Go To Bill button. When you do this, QuickBooks displays the Enter Bills window with the bill information. To close the Enter Bills window, click the Close button.

  5. Set the discount and credit.

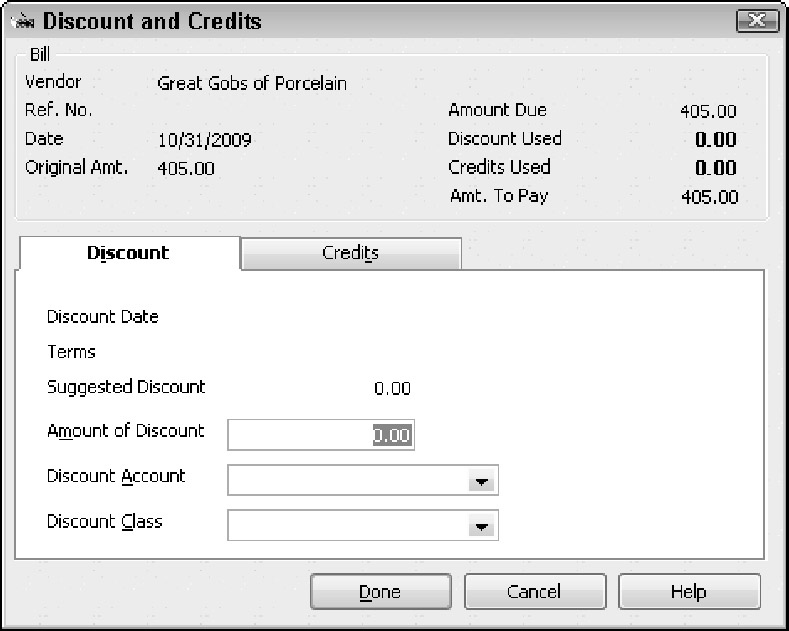
    If you click the Set Discount button, QuickBooks displays the Discount tab of the Discount and Credits window, as shown in Figure 2. You can use the Discount tab to enter a discount amount for the bill. If you enter a discount amount for the bill, you also enter the discount account. This is the account that gets credited for the reduction — the discount — in the correct amount.

    Figure 2: The Discount tab of the Discount and Credits dialog box

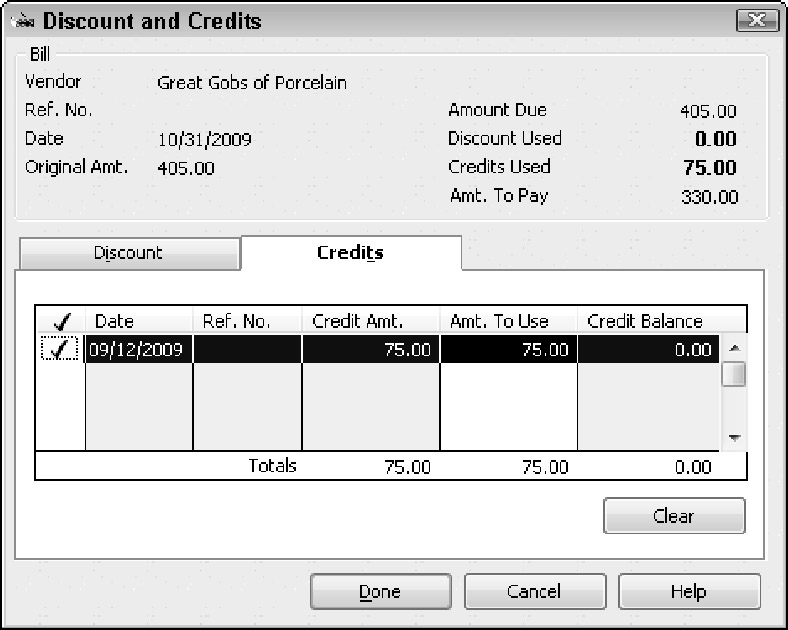
    If you click the Set Credits button, QuickBooks displays the Credits tab of the Discount and Credits dialog box, shown in Figure 3. The Credit tab lists any credit memos from this vendor. To apply a credit memo to the amount due a vendor, click the Set Credits button. QuickBooks marks applied credits by placing a check mark in the marked column.

    Figure 3: The Credits tab of the Discount and Credits dialog box

    When you complete your work with the Discounts and Credits dialog box, click the Done button to close the dialog box and return to the Pay Bills window.


    Tip

    Click the Clear button in the Discount and Credits dialog box to clear the applied credits shown on the Credits tab.

  6. Use the Payment Account drop-down list to select the bank account to be used for making payments.

    The ending balance for the bank account shows the Payment Account drop-down list.

  7. Use the Payment Method drop-down list to select the payment method.

    If you want to pay your bills by check, for example, select Check. Assuming that you'll print the checks in QuickBooks, select the To Be Printed radio button (otherwise, select the Assign Check No. radio button to have QuickBooks assign the next consecutive check number). You can also pay bills by other methods, such as by credit card and by online payment (if you're set up for online payment or online banking).

  8. Use the Payment Date drop-down list to record the payment date that you want.

    The payment date entry interacts with the payment method entry. The payment date that you set, for example, affects when an online payment gets made. The payment date also corresponds to the check date that is shown on printed checks.

  9. After you select the bills that you want to pay and describe how you want to pay them, click Pay Selected Bills to pay the selected bills.

    QuickBooks records the payment transactions in the bank account to pay the selected bills. QuickBooks also closes the Pay Bills window.

  10. Complete your task.

    You still need to print any unprinted checks necessary to pay bills if you are using checks to pay the bills. You also need to transmit any online payment instructions necessary to pay the bills if that's how you've chosen to pay the bills. If you're going to hand-write checks, you obviously need to hand-write the checks and then mail them out. In other words, all QuickBooks does at this point is record in the QuickBooks data file the payment transactions. It hasn't yet affected the transactions. You need to print the checks, send the online payment instructions, or hand-write the checks?

Related Posts with Thumbnails