Friday, June 12, 2009

Receiving Customer Payments

When a customer pays an invoice that you have previously sent, you choose the Customers ð Receive Payments command to record the payment. To use this command to record a payment, choose the command and then follow these steps:

  1. After QuickBooks displays the Receive Payments window, as shown in Figure 1, use the Received From box to identify the customer paying you.

    Figure 1: The Receive Payments window

  2. Record the payment information in the Date, Amount, Reference #box, Pmt. Method box, and Card No. and Exp. Date boxes (if appropriate).

  3. Identify the invoice or invoices paid.

    QuickBooks lists the open invoices for the customer in the columns area of the Receive Payments window. You can identify which invoices a customer payment pays by clicking the invoices that you see listed.

  4. Apply any credit memos to open invoices as you apply the payment.

    Click the Discount & Credits button. QuickBooks displays the Discount and Credits dialog box, as shown in Figure 2. To apply a credit to the selected invoices, click the Credits tab and then select the credit that you want to apply.

    Figure 1-21: The Discount and Credits dialog box

  5. Apply any discounts to the open invoices and click Done.

    Discounts work like credits. In fact, you use the same dialog box (refer to Figure 2).

  6. Select the account to which you want to deposit the check or select the Group with Other Undeposited Funds option from the Deposit To box to indicate whether you immediately deposit the payment or batch the payment with a bunch of other payments that you later deposit.


  7. Click the Save & Close or Save & New button to save the customer payment information.


Tip

Click the Get Online Pmts button to receive online payment information for a customer. The Get Online Pmts button appears only if you are using either online billing or online banking. An earlier discussion describes how online billing and deluxe online billing work.


Tip

To see a list of the payments that have been applied to an invoice, click the History button.

Wednesday, June 10, 2009

Recording Credit Memos

Credit memos show when a customer no longer owes you money or when you owe a customer money. Credit memos may occur because your customer returns items that you previously sold to him or her. Credit memos may also occur because you issue a customer a refund for some other good reason — perhaps the product wasn't of the quality that you usually sell, or a service wasn't provided in the manner in which it should have been.

To record a credit memo, first display the Create Credit Memos/Refunds window by choosing Customers ð Create Credit Memos/Refunds command. Then follow these steps:

  1. Identify the customer, or the customer and the job, in the Customer:Job box.

    Use the Class box for class tracking if you've decided to do that (see Figure 1). If you have questions about how either of these boxes works, refer to the earlier discussion about these two boxes. These boxes work the same way for credit memos as they do for invoices.

    Figure 1: The Create Credit Memos/Refunds window


  2. Provide the credit memo date, credit memo number, and confirm customer information.

    Credit memos, like invoices and sales receipts, include a header. This header includes the transaction date, number, and the customer information. You should confirm that the credit memo header information is correct on the Create Credit Memos/Refunds window. If it isn't, edit the default information that QuickBooks uses to fill the Create Credit Memos/Refunds window.

  3. In the columns area of the Create Credit Memos/Refunds window, describe the reason for the credit memo.

    If the customer returned items, for example, use the columns to describe these items and the original price that you are refunding.

  4. Click the Print button to print the credit memo.

  5. Click either Save & Close or Save & New to save the credit memo.

    Note, too, that you can also print credit memos in a batch. Obviously, after you print credit memos, you need to distribute them.

Monday, June 8, 2009

Recording a Sales Receipt | Invoicing Customers

To record the fact that you sold the customer some item — presumably this is because the customer simultaneously purchases and pays for the item or service — you don't invoice the customer. Rather, you create a sales receipt. A sales receipt looks very, very similar to an invoice. However, it doesn't include shipping information (because that's irrelevant) and it lets you record the amount that the customer pays.

To record a sales receipt when it is appropriate, choose the Customers ð Enter Sales Receipts command and then follow these steps:

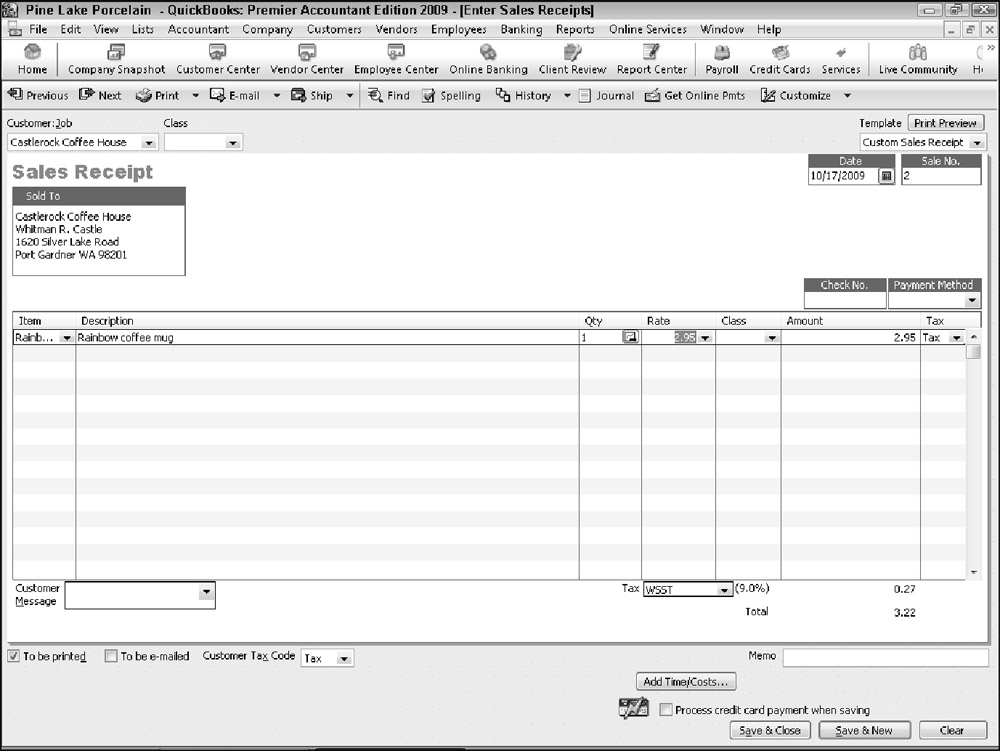
  1. In the Enter Sales Receipts window, shown in Figure 1, use the Customer:Job box to describe the customer or, optionally, the customer and job.

    Figure 1: The Enter Sales Receipts window

    Use the Class drop-down list to identify the class if you are performing class tracking.


  2. Provide the sales receipt header info.

    A sales receipt, like an invoice, includes some header information. Specifically, the sales receipt includes a sales receipt date and a sales number. The sales receipt also includes a Sold To box, which shows the customer name and address. You should confirm that this information is correct — and it should be if you're recording timely sales receipts and have an up-to-date Customer List.

  3. Use the items column to describe the items that you're selling.

    The items column on a sales receipt works the exact same way as the items column on an invoice. Therefore, rather than repeat myself, go back to the earlier discussion of how this column works.

  4. (Optional) If you want, enter a customer message in the footer area of the Enter Sales Receipts window.

    If you have added other footer information to the Enter Sales Receipts window — this would be because you have customized the sales receipt form template — you can include that information, too.

  5. Describe where the sales proceeds go.

    In the bottom-left corner, the Enter Sales Receipts window may show a Deposit To drop-down list. Use this drop-down list to indicate what you do with the money that you receive from this sale. If you immediately deposit the amount into a bank account, select the account into which you will deposit the check. If you want to batch this receipt with a bunch of other receipts — maybe you're going to deposit the day's receipts together in one lump sum — select Group with Other Undeposited Fund.


    Tip

    If you don't see the Deposit To drop-down list, you may have indicated (perhaps even inadvertently) during the setup that you just want QuickBooks to assume funds are deposited into an undeposited funds account. This probably works just fine. If you do want to specify an account where sales proceeds go when you record the sales receipt, choose the Edit ð Preferences command, click the Sales and Customers icon, click the Company Preferences tab, and then unmark the Use Undeposited Funds as a default deposit to account.


  6. (Optional) To print a copy of the receipt, click the Print button.

    The Previous, Next, Find, Spelling, History, and Time/Cost buttons on the Enter Sales Receipts window work identically to the same buttons on the Create Invoices window.

  7. Click the Save & Close or Save & New button to save the sales receipt.

    These buttons work the same way for the Enter Sales Receipts window as they do for the Create Invoices window.


Tip

Both the Create Invoices window and the Enter Sales Receipts window include a To Be Printed check box in the footer area. If you select this check box, QuickBooks adds the invoice or sales receipt to its list of unprinted invoices or sales receipts. You can print invoices and sales receipts that appear on either side of these lists by choosing the File ð Print Forms command and then either the Invoices or Sales Receipt command. There's also a To Be E-mailed check box that you can mark if you want to later e-mail a receipt

Sunday, June 7, 2009

Printing & Emailing Invoices | Invoicing Customers

Printing Invoices

You can print invoices and then mail the printed invoices in a couple of different ways:

  • You can print individual invoices by clicking the Print button at the top of the Create Invoices window.

  • You can also print a batch of invoices by clicking the arrow button next to the Print button, choosing Print Batch from the menu that QuickBooks displays, and then using the Select Invoices to Print dialog box (which QuickBooks displays) to select the To Be Printed Invoices for printing. After you select the invoices that you want to print by clicking them, you click OK.


Tip

The menu that QuickBooks displays when you click the Print arrow button includes a Preview command. You can choose the Preview command to see a preview version of the printed invoice.


E-Mailing Invoices

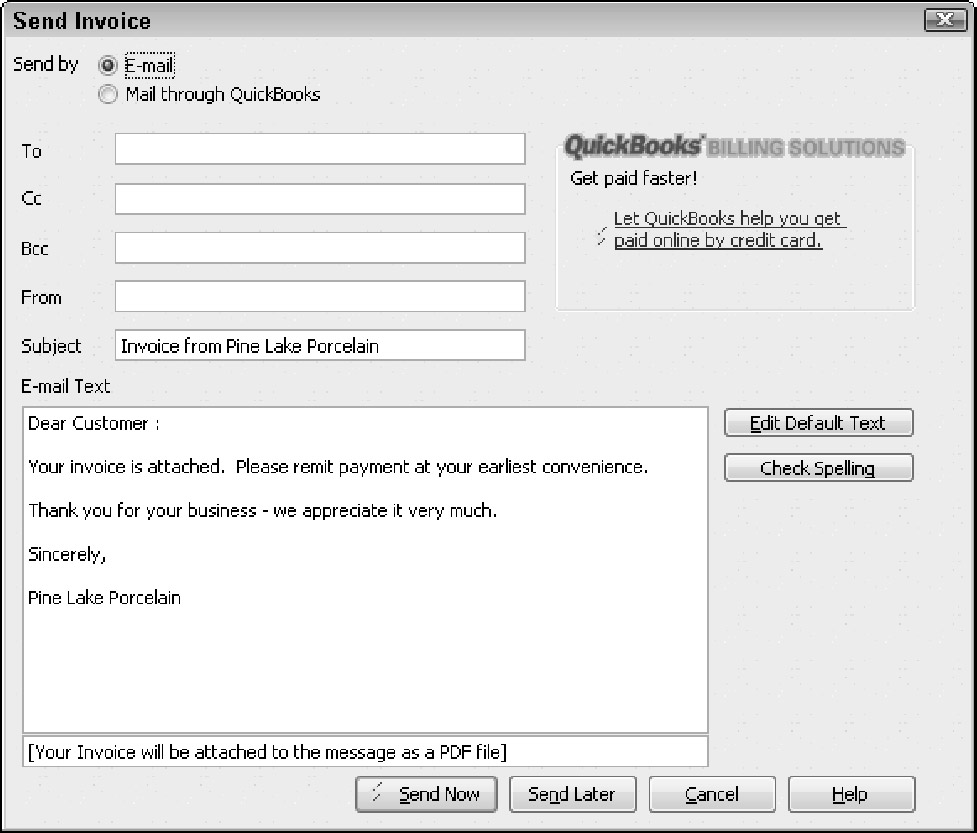
You can e-mail an invoice from QuickBooks. To do this, click the Send button and choose the Mail Invoice command from the menu that QuickBooks displays. (The Send button appears at the top of the Create Invoice screen.) When QuickBooks displays the Send Invoice dialog box, as shown in Figure 1, provide the e-mail address and, optionally, a new e-mail message. Then click the Send Now button to send the invoice. Alternatively, you can click the Send Later button to batch your e-mail invoices for later delivery. To send all your invoices in a batch later, you click the arrow button next to the Send button at the top of the Create Invoices window and choose the Send Batch command from the menu that QuickBooks displays.

Figure 1: The Send Invoice dialog box

Tip

You can also use the Send Invoice dialog box to send the invoice to QuickBooks and then have the QuickBooks folks mail a paper copy to the customer or client. To do this, mark the Mail through QuickBooks button. QuickBooks then tells you about this extra service and, if you decide to go for it, steps you through the sign-up process.

Related Posts with Thumbnails