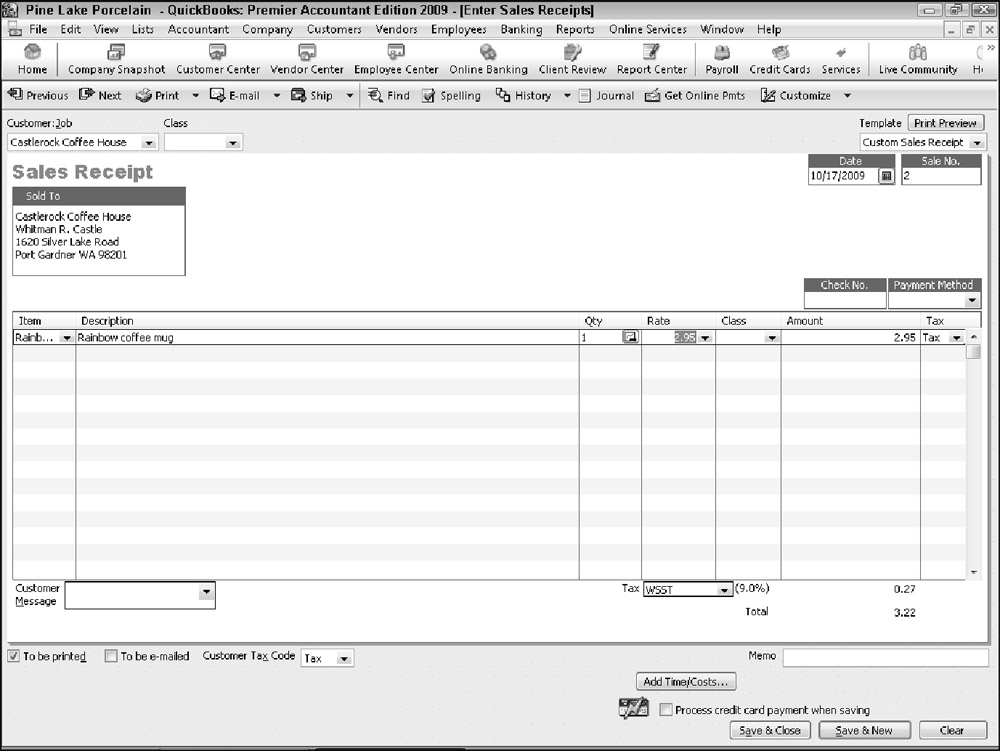
To record the fact that you sold the customer some item — presumably this is because the customer simultaneously purchases and pays for the item or service — you don't invoice the customer. Rather, you create a sales receipt. A sales receipt looks very, very similar to an invoice. However, it doesn't include shipping information (because that's irrelevant) and it lets you record the amount that the customer pays.
To record a sales receipt when it is appropriate, choose the Customers ð Enter Sales Receipts command and then follow these steps:
-
In the Enter Sales Receipts window, shown in Figure 1, use the Customer:Job box to describe the customer or, optionally, the customer and job.
Use the Class drop-down list to identify the class if you are performing class tracking.
-
Provide the sales receipt header info.
A sales receipt, like an invoice, includes some header information. Specifically, the sales receipt includes a sales receipt date and a sales number. The sales receipt also includes a Sold To box, which shows the customer name and address. You should confirm that this information is correct — and it should be if you're recording timely sales receipts and have an up-to-date Customer List.
-
Use the items column to describe the items that you're selling.
The items column on a sales receipt works the exact same way as the items column on an invoice. Therefore, rather than repeat myself, go back to the earlier discussion of how this column works.
-
(Optional) If you want, enter a customer message in the footer area of the Enter Sales Receipts window.
If you have added other footer information to the Enter Sales Receipts window — this would be because you have customized the sales receipt form template — you can include that information, too.
-
Describe where the sales proceeds go.
In the bottom-left corner, the Enter Sales Receipts window may show a Deposit To drop-down list. Use this drop-down list to indicate what you do with the money that you receive from this sale. If you immediately deposit the amount into a bank account, select the account into which you will deposit the check. If you want to batch this receipt with a bunch of other receipts — maybe you're going to deposit the day's receipts together in one lump sum — select Group with Other Undeposited Fund.
Tip If you don't see the Deposit To drop-down list, you may have indicated (perhaps even inadvertently) during the setup that you just want QuickBooks to assume funds are deposited into an undeposited funds account. This probably works just fine. If you do want to specify an account where sales proceeds go when you record the sales receipt, choose the Edit ð Preferences command, click the Sales and Customers icon, click the Company Preferences tab, and then unmark the Use Undeposited Funds as a default deposit to account.
-
(Optional) To print a copy of the receipt, click the Print button.
The Previous, Next, Find, Spelling, History, and Time/Cost buttons on the Enter Sales Receipts window work identically to the same buttons on the Create Invoices window.
-
Click the Save & Close or Save & New button to save the sales receipt.
These buttons work the same way for the Enter Sales Receipts window as they do for the Create Invoices window.
| Tip | Both the Create Invoices window and the Enter Sales Receipts window include a To Be Printed check box in the footer area. If you select this check box, QuickBooks adds the invoice or sales receipt to its list of unprinted invoices or sales receipts. You can print invoices and sales receipts that appear on either side of these lists by choosing the File ð Print Forms command and then either the Invoices or Sales Receipt command. There's also a To Be E-mailed check box that you can mark if you want to later e-mail a receipt |


1 comment:
Halo,I'm Helena Julio from Ecuador,I want to talk good about Le_Meridian Funding Service on this topic.Le_Meridian Funding Service gives me financial support when all bank in my city turned down my request to grant me a loan of 500,000.00 USD, I tried all i could to get a loan from my banks here in Ecuador but they all turned me down because my credit was low but with god grace I came to know about Le_Meridian so I decided to give a try to apply for the loan. with God willing they grant me loan of 500,000.00 USD the loan request that my banks here in Ecuador has turned me down for, it was really awesome doing business with them and my business is going well now. Here is Le_Meridian Funding Investment Email/WhatsApp Contact if you wish to apply loan from them.Email:lfdsloans@lemeridianfds.com / lfdsloans@outlook.comWhatsApp Contact:+1-989-394-3740.
Post a Comment