Showing posts with label Invoicing Customers. Show all posts

Tuesday, June 16, 2009

Customer Odds and Ends

In this chapter, I discuss most of the important commands on the Customers menu. However, the Customers menu supplies several other commands that are noteworthy — perhaps even useful — and deserve discussion somewhere in this book. For this reason, I want to briefly describe the other commands available on the Customers menu:

  • Customer Center: Displays the Customer Center window, which includes information about your customer list, including the amounts that your customers owe.

  • Enter Statement Charges: Displays the Accounts Receivable Register. You shouldn't need to use this command. You can, however, use this command to add amounts to the accounts receivable for a particular customer. The amounts then appear on the customer's next statement.

  • Create Statements: Displays a window that you can use to create a set of monthly statements for customers. Such statements show the amounts that a customer owes, invoices created for the month, credit memos issued for the month, and payments made during the month.

  • Add Credit Card Processing: Displays a submenu of commands that you can use to deal with credit card payments and credit card billing. QuickBooks, by the way, supports credit card merchant accounts and makes it easy to accept credit cards from customers. This is something you may want to do. You should visit the QuickBooks Web site and find out the details.

  • Marketing and Customer Tools: Displays a Web page of marketing tools that Intuit (the maker of QuickBooks) supplies to small businesses, including a tool to submit your small business's Web site to online directories, such as Google Maps and Yahoo! Local.

  • Item List: Displays the Item List, which shows the items that may be included on the invoice or credit memo.

  • Change Item Prices: Lets you change the prices of a bunch of different items at one time — for example, increasing every price by 5 percent.

Friday, June 12, 2009

Receiving Customer Payments

When a customer pays an invoice that you have previously sent, you choose the Customers ð Receive Payments command to record the payment. To use this command to record a payment, choose the command and then follow these steps:

  1. After QuickBooks displays the Receive Payments window, as shown in Figure 1, use the Received From box to identify the customer paying you.

    Figure 1: The Receive Payments window

  2. Record the payment information in the Date, Amount, Reference #box, Pmt. Method box, and Card No. and Exp. Date boxes (if appropriate).

  3. Identify the invoice or invoices paid.

    QuickBooks lists the open invoices for the customer in the columns area of the Receive Payments window. You can identify which invoices a customer payment pays by clicking the invoices that you see listed.

  4. Apply any credit memos to open invoices as you apply the payment.

    Click the Discount & Credits button. QuickBooks displays the Discount and Credits dialog box, as shown in Figure 2. To apply a credit to the selected invoices, click the Credits tab and then select the credit that you want to apply.

    Figure 1-21: The Discount and Credits dialog box

  5. Apply any discounts to the open invoices and click Done.

    Discounts work like credits. In fact, you use the same dialog box (refer to Figure 2).

  6. Select the account to which you want to deposit the check or select the Group with Other Undeposited Funds option from the Deposit To box to indicate whether you immediately deposit the payment or batch the payment with a bunch of other payments that you later deposit.


  7. Click the Save & Close or Save & New button to save the customer payment information.


Tip

Click the Get Online Pmts button to receive online payment information for a customer. The Get Online Pmts button appears only if you are using either online billing or online banking. An earlier discussion describes how online billing and deluxe online billing work.


Tip

To see a list of the payments that have been applied to an invoice, click the History button.

Monday, June 8, 2009

Recording a Sales Receipt | Invoicing Customers

To record the fact that you sold the customer some item — presumably this is because the customer simultaneously purchases and pays for the item or service — you don't invoice the customer. Rather, you create a sales receipt. A sales receipt looks very, very similar to an invoice. However, it doesn't include shipping information (because that's irrelevant) and it lets you record the amount that the customer pays.

To record a sales receipt when it is appropriate, choose the Customers ð Enter Sales Receipts command and then follow these steps:

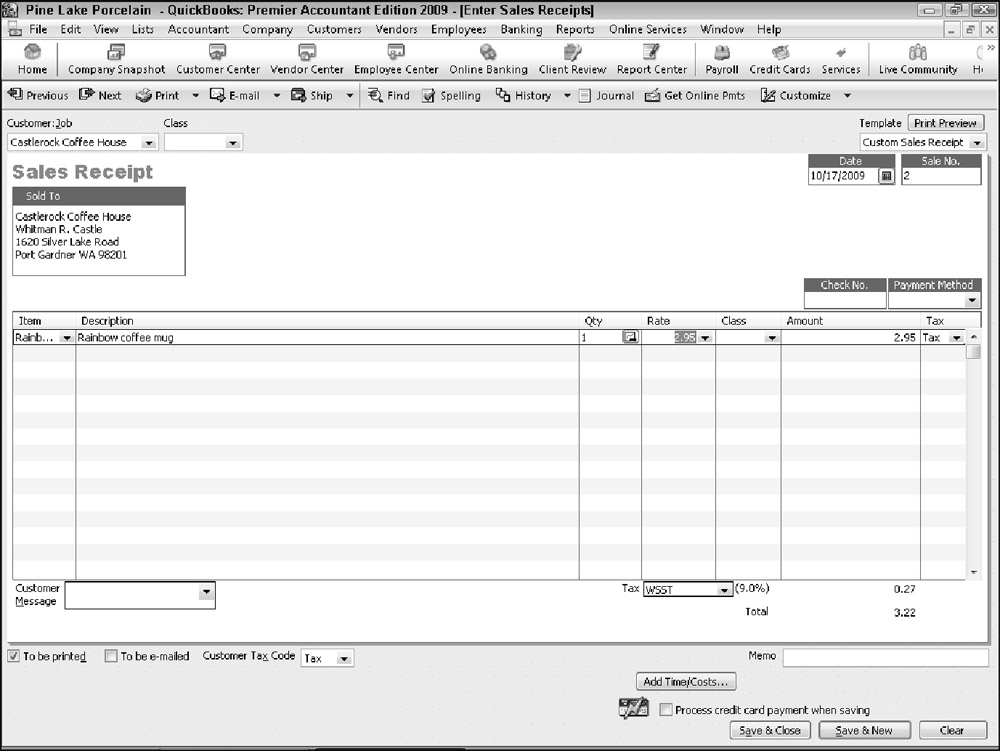
  1. In the Enter Sales Receipts window, shown in Figure 1, use the Customer:Job box to describe the customer or, optionally, the customer and job.

    Figure 1: The Enter Sales Receipts window

    Use the Class drop-down list to identify the class if you are performing class tracking.


  2. Provide the sales receipt header info.

    A sales receipt, like an invoice, includes some header information. Specifically, the sales receipt includes a sales receipt date and a sales number. The sales receipt also includes a Sold To box, which shows the customer name and address. You should confirm that this information is correct — and it should be if you're recording timely sales receipts and have an up-to-date Customer List.

  3. Use the items column to describe the items that you're selling.

    The items column on a sales receipt works the exact same way as the items column on an invoice. Therefore, rather than repeat myself, go back to the earlier discussion of how this column works.

  4. (Optional) If you want, enter a customer message in the footer area of the Enter Sales Receipts window.

    If you have added other footer information to the Enter Sales Receipts window — this would be because you have customized the sales receipt form template — you can include that information, too.

  5. Describe where the sales proceeds go.

    In the bottom-left corner, the Enter Sales Receipts window may show a Deposit To drop-down list. Use this drop-down list to indicate what you do with the money that you receive from this sale. If you immediately deposit the amount into a bank account, select the account into which you will deposit the check. If you want to batch this receipt with a bunch of other receipts — maybe you're going to deposit the day's receipts together in one lump sum — select Group with Other Undeposited Fund.


    Tip

    If you don't see the Deposit To drop-down list, you may have indicated (perhaps even inadvertently) during the setup that you just want QuickBooks to assume funds are deposited into an undeposited funds account. This probably works just fine. If you do want to specify an account where sales proceeds go when you record the sales receipt, choose the Edit ð Preferences command, click the Sales and Customers icon, click the Company Preferences tab, and then unmark the Use Undeposited Funds as a default deposit to account.


  6. (Optional) To print a copy of the receipt, click the Print button.

    The Previous, Next, Find, Spelling, History, and Time/Cost buttons on the Enter Sales Receipts window work identically to the same buttons on the Create Invoices window.

  7. Click the Save & Close or Save & New button to save the sales receipt.

    These buttons work the same way for the Enter Sales Receipts window as they do for the Create Invoices window.


Tip

Both the Create Invoices window and the Enter Sales Receipts window include a To Be Printed check box in the footer area. If you select this check box, QuickBooks adds the invoice or sales receipt to its list of unprinted invoices or sales receipts. You can print invoices and sales receipts that appear on either side of these lists by choosing the File ð Print Forms command and then either the Invoices or Sales Receipt command. There's also a To Be E-mailed check box that you can mark if you want to later e-mail a receipt

Sunday, June 7, 2009

Printing & Emailing Invoices | Invoicing Customers

Printing Invoices

You can print invoices and then mail the printed invoices in a couple of different ways:

  • You can print individual invoices by clicking the Print button at the top of the Create Invoices window.

  • You can also print a batch of invoices by clicking the arrow button next to the Print button, choosing Print Batch from the menu that QuickBooks displays, and then using the Select Invoices to Print dialog box (which QuickBooks displays) to select the To Be Printed Invoices for printing. After you select the invoices that you want to print by clicking them, you click OK.


Tip

The menu that QuickBooks displays when you click the Print arrow button includes a Preview command. You can choose the Preview command to see a preview version of the printed invoice.


E-Mailing Invoices

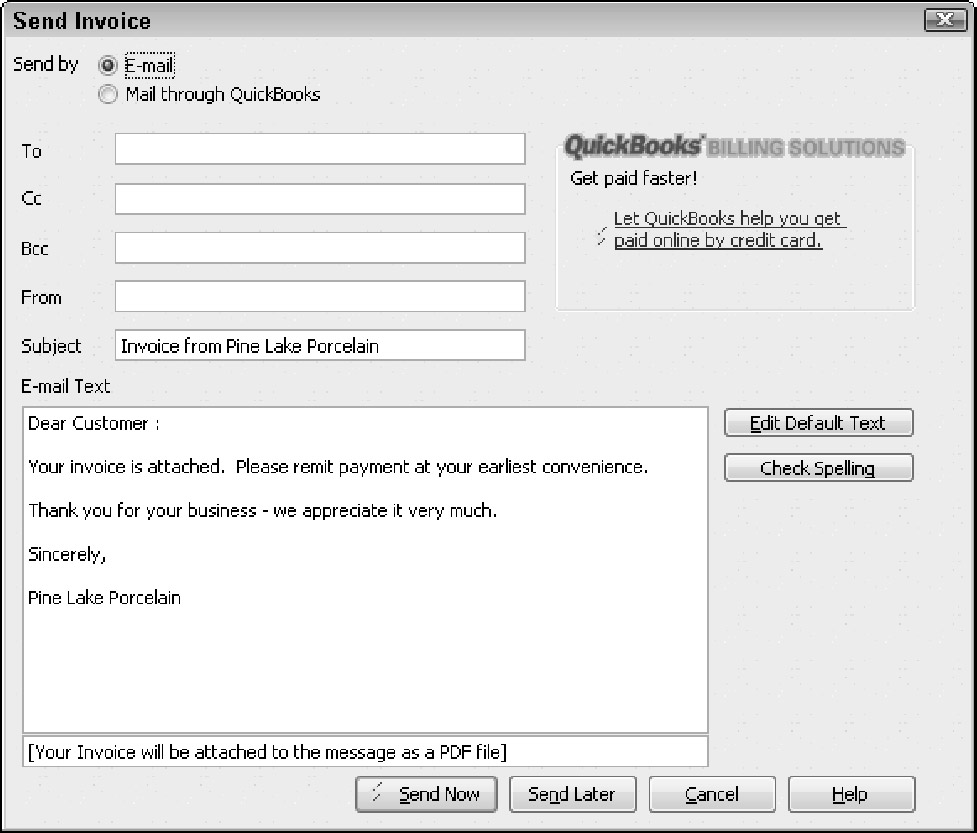
You can e-mail an invoice from QuickBooks. To do this, click the Send button and choose the Mail Invoice command from the menu that QuickBooks displays. (The Send button appears at the top of the Create Invoice screen.) When QuickBooks displays the Send Invoice dialog box, as shown in Figure 1, provide the e-mail address and, optionally, a new e-mail message. Then click the Send Now button to send the invoice. Alternatively, you can click the Send Later button to batch your e-mail invoices for later delivery. To send all your invoices in a batch later, you click the arrow button next to the Send button at the top of the Create Invoices window and choose the Send Batch command from the menu that QuickBooks displays.

Figure 1: The Send Invoice dialog box

Tip

You can also use the Send Invoice dialog box to send the invoice to QuickBooks and then have the QuickBooks folks mail a paper copy to the customer or client. To do this, mark the Mail through QuickBooks button. QuickBooks then tells you about this extra service and, if you decide to go for it, steps you through the sign-up process.

Saturday, June 6, 2009

Billing for Time | Invoicing Customers

Most of the time, line items that appear on an invoice are items that you have described in the item list and then quantify directly on the invoice. However, in some service businesses, you may actually sell many units of the same item. For example, a lawyer may sell hours or partial hours of legal advice. This may be all that she sells. A CPA may sell hours of consulting or accounting or tax preparation work.

In these circumstances, you don't want to have an invoice go out to the customer with one line on it that says, for example, "legal services, 100 hours, $20,000." You instead want an invoice that details each of the tasks that the lawyer performed: estate planning for 1.5 hours, review of a contract for 4 hours, preparation of a new real estate lease for 2 hours, and so forth. To provide this level of detail — detail that is really beneath the item — you use the QuickBooks Time Tracking feature.

QuickBooks supplies two methods for tracking the time spent that will be billed on an invoice as an item. You can use the weekly time sheet or you can time or record individual activities. I briefly describe how both time tracking methods work — neither is difficult. Professional service providers — such as accountants, attorneys, consultants, architects, and so on — should consider using one of these features to make sure that they accurately keep good records of the time spent working for a client or customer.

Using a Weekly Timesheet

To use the weekly timesheet method, choose the Customers ð Enter Time ð Use Weekly Timesheet command. QuickBooks displays the Weekly Timesheet window, shown in Figure 1. To use the Weekly Timesheet window, first use the Name box to identify the employee or vendor or other person performing the service. You should be able to select this person's name from the Name box. If you can't select a person's name from the Name box, enter the person's name into the box, and then, when prompted, tell QuickBooks which list (employee, vendor, or other names) should be added. After you've added the name of the person performing the work, use the columns of the Weekly Timesheet window to describe the customer or job for whom the work has been performed, the service code, a brief description or note, the payroll item (if you're using QuickBooks for payroll), the class (if you're tracking classes), and then the hours spent per day. You can enter as many lines onto the Weekly Timesheet window as you want. Each line appears separately on an invoice. The notes information appears in the description area of the invoice. For this reason, you want to use appropriate and descriptive notes.

Figure 1: The Weekly Timesheet window

Timing Single Activities

If you want to record service activities as they occur, choose the Customers ð Enter Time ð Time/Enter Single Activity command. QuickBooks displays the Time/Enter Single Activity window, as shown in Figure 2.

Figure 2: The Time/Enter Single Activity window

To time or record a single activity, record the activity date into the Date box. Use the Name box to identify the person performing the service. In the Customer:Job box, identify the customer or the job for which the service is being performed. Select the appropriate service item from the Service Item drop-down list and the appropriate payroll item from the Payroll Item drop-down list. If you're tracking classes, predictably, you can also use the Class drop-down list to classify the activity. The Notes box should be used to record a brief appropriate description of the service. This description appears on the invoice, so be thoughtful about what you write. After describing or providing this general information about the service, you have two ways to record the time spent on the service:

  • Manually record time: You can manually record the time spent on an activity by using the Duration box to enter the time. If you spent 10 minutes, for example, enter 0:10 into the Duration box. If you spent 3 hours and 40 minutes, enter 3:40 into the Duration box.

  • Have QuickBooks record the time: You can also have QuickBooks record the time that you spent on the activity. Just click the Start button in the Duration box when you start the activity, and click the Stop button when you stop the activity. If you want to pause the timer (while you take a phone call, for example) click the Pause button.

After you describe the activity you're performing in the Time/Enter Single Activity window, click the Save & New or Save & Close button to save the activity information.


Tip

Verify that the Billable check box is selected. The Billable check box appears in the upper-right corner of the Time/Enter Single Activity window. By selecting the Billable box, you tell QuickBooks that it should keep this record of a billable activity for later inclusion on an invoice.


Tip

You can use the Previous and Next buttons that appear at the top of the Time/Enter Single Activity window to page back and forth through your records of activity timing. Note, too, that the Spelling button is also available on the Time/Enter Single Activity window. You can, therefore, click the Spelling button to spell check the notes description that you enter — which is a good idea because this information will later appear on an invoice.


Tip

QuickBooks also allows your employees to enter their time directly. Choose the Customers ð Enter Time ð Let Employees Enter Their Time command to get information about how this Web service works.

Including Billable Time on an Invoice

To add billable time and cost to an invoice, create the invoice in the usual way, as I describe previously. After you identify the customer (and if you've entered time for the customer), and if you've been tracking time or costs for the customer, QuickBooks will ask if you want to bill for any of the time or costs using a message box. If you indicate "yes," QuickBooks displays the Choose Billable Time and Costs dialog box shown in Figure 3. The Time tab of the Choose Billable Time and Costs dialog box shows each of the times that you've recorded for a customer. To add these times to the invoice, click the Use column for the time. Or, if you want to select all the times, click the Select All button. Then click OK. QuickBooks then adds each of these billable times as lines to the invoice. Figure 4 shows how billable time information appears on the Create Invoices window.

Figure 3: The Choose Billable Time and Costs dialog box

Figure 4: The Create Invoices window billing for billable time


Related Posts with Thumbnails